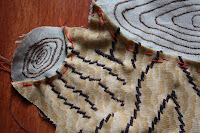
 As the moustache and beard necklace how-to was such a success (everyone in London seams to be wearing one!), I thought, surely everyone will want a tree stump pillow in there home. So here's how:
Draw your tree stump on some tissue paper in the size you would like your pillow, cut it out and then cut out the semi circular pieces for the top and branch top.
Pin the paper pieces to the desired fabric and draw around the edge with tailors chalk or pen, cut the fabric double over if you want both sides the same. Leave about a 1.5 cm seam allowance. You can now begin to machine embroider your tree rings using a very close, narrow zig zag stitch. I kept the last ring at the same spot in relation to my sewing machine foot in order to keep the rings evenly spaced
Next draw on your bark design using chalk (my pen ran out), and machine embroider using a close zig zag or a fancy stitch if you've got them. Fold the seam allowance over at the top of the main stump and tack in place, you will need to snip into the curve a bit so it lets you curve the fold. Attach the main part to the top with a tacking stitch.
Do the same with the small branch top. Over stitch these edges using the close zig zag stitch. Repeat everything so far if you want the other side to look the same, or if like me you've lost interest a bit, pin your tree stump onto a different fabric (this is good for 'stash busters') right sides together, and cut around the edge.
Sew the two together, leaving a gap at the top for stuffing. Snip the corners and notch the curves. Turn right side out and begin to marvel at just how realistic it really is! Stuff with kapok, or as I have, open up an old pillow and re-use the stuffing.
Sew up the gap with a small over stitch and bob's your uncle! Hours of woodland pleasure.
P.S. I hope I don't have to use the word 'stump' in another blog post for a long long time.


2 comments:
This is SSSOOOOOOOOOOOOOOOO good! You are amazing! I didn't know I needed a tree stump pillow, but now I definately do. You are acreative visionary! xxxx
Aw thanks! so glad you like it. I hope you make one. xx
Post a Comment